The Chat Completion model revolutionizes conversational experiences by proficiently generating responses derived from given contexts and inquiries. This innovative system harnesses the power of the Mistral-7B-Instruct-v0.2 model, renowned for its sophisticated natural language processing capabilities. The model can be accessed via Hugging Face at – https://huggingface.co/mistralai/Mistral-7B-Instruct-v0.2.
Operating on a dedicated GPU server g4dn.2xlarge, self-deployed on the robust infrastructure of Amazon Web Services (AWS), the Chat Completion model ensures optimal performance and scalability. This choice of hardware configuration allows for efficient parallel processing, enabling swift response generation and seamless integration with existing chat platforms.
At its essence, the Chat Completion model’s main objective is to furnish users with accurate and contextually relevant responses. With a strict adherence to a word limit of 500, the model ensures that its outputs are concise yet informative, facilitating fluid and engaging conversational exchanges.
By streamlining chat interactions across diverse platforms and applications, the Chat Completion model serves as a catalyst for enhancing communication efficiency and user satisfaction. Whether deployed in customer support systems, virtual assistants, or social media messaging platforms, its ability to deliver timely and pertinent responses enriches the overall conversational experience for both users and businesses alike.
Step by Step Procedure to Install and Configure the chat completion model on EC2
Prerequisites
Ubuntu OS
Hardware requirements:
- 1 x NVIDIA T4 GPU with 16 GB GPU memory
- 8 vCPU
- 32 GB RAM
- Disk space – 150GB
Chat Completion Model Server Installation
1. Set Up Your AWS Infrastructure Using EC2
Navigate to the EC2 service on Amazon Web Services (AWS) and click on launch instance.
2. Select the Right AMI Image
Choose a name for your instance and choose the Ubuntu AMI. Under Ubuntu, pick the Deep Learning AMI GPU PyTorch 2.0.1 (Ubuntu 20.04) 20230926 image, which comes with Ubuntu, Nvidia drivers, Cuda, and PyTorch already included.
3. Configure Your Instance Type
Ensure optimal performance by selecting the g4dn.2xlarge instance type.
4. Deploy your EC2
Deploy your EC2 instance by clicking on the “Launch Instance” button.
5. Login into Putty server
For logging into the Putty server, the following details are required:
- Server IP: [insert server IP here]
- Auto-login username: [insert auto-login username here]
- Key for login to server: [insert key for login to server here]
6. Check NVIDIA Configuration
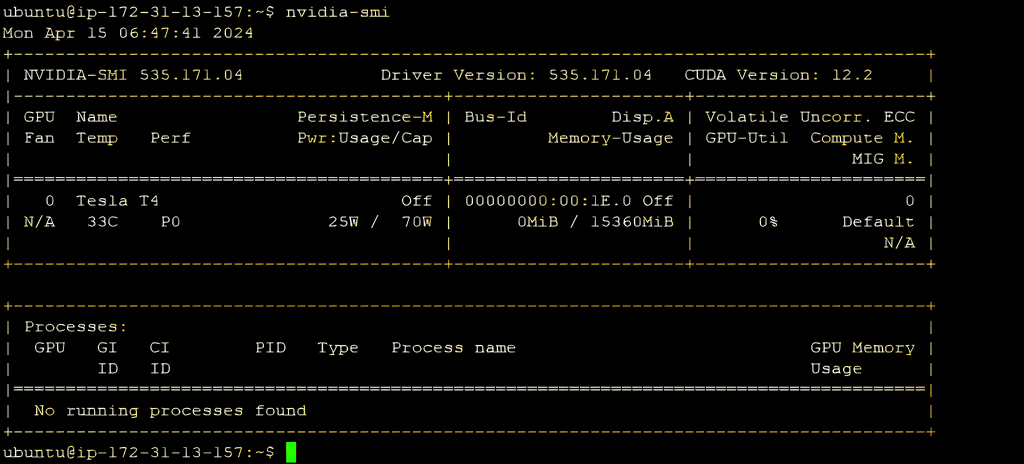
Verify proper GPU resource allocation by inspecting the NVIDIA configuration with the command nvidia-smi.

7. Manually Install requirements
To prepare your environment for the chat completion model, manually install the required packages using the following command –
“pip install git+https://github.com/huggingface/transformers torch bitsandbytes accelerate”
8. Prepare Python File
Set up a Python file containing the necessary code for interacting with the Mistral 7B , including library imports and and defining messages for the conversation.
					from transformers import AutoModelForCausalLM, AutoTokenizer, BitsAndBytesConfig
import torch
device = “cuda” # the device to load the model onto

quantization_config = BitsAndBytesConfig(load_in_4bit=True,
   bnb_4bit_quant_type=“nf4”,
   bnb_4bit_compute_dtype=torch.float16,
           )
model = AutoModelForCausalLM.from_pretrained(“mistralai/Mistral-7B-Instruct-v0.1”,quantization_config=quantization_config, device_map=“auto”)
tokenizer = AutoTokenizer.from_pretrained(“mistralai/Mistral-7B-Instruct-v0.1”)
messages = [
{“role”: “user”, “content”: “What is your favourite condiment?”}

]
encodeds = tokenizer.apply_chat_template(messages, return_tensors=“pt”)
model_inputs = encodeds.to(device)
model.to(device)
generated_ids = model.generate(model_inputs, max_new_tokens=500,   do_sample=True,pad_token_id=tokenizer.eos_token_id,eos_token_id=tokenizer.eos_token_id)
decoded = tokenizer.batch_decode(generated_ids)
print(decoded[0])
9. Run the Python File
Execute the code with the command python3 your_file_name.py to generate response.
In conclusion, the chat completion model can be seamlessly accessed through a REST API by configuring an endpoint for inputting text within the request body. Once the API is set up, containerization via a Dockerfile simplifies deployment, ensuring smooth access to the model. By creating an image and launching a container on the server, Docker eliminates the need for individual installations, enhancing performance, scalability, and ease of deployment. This streamlined approach not only optimizes communication but also fosters more efficient and effective interactions within chat-based applications.
-
Step by Step Procedure to Install and Configure the chat completion model on EC2
- Prerequisites
- Chat Completion Model Server Installation
- 1. Set Up Your AWS Infrastructure Using EC2
- 2. Select the Right AMI Image
- 3. Configure Your Instance Type
- 4. Deploy your EC2
- 5. Login into Putty server
- 6. Check NVIDIA Configuration
- 7. Manually Install requirements
- 8. Prepare Python File
- 9. Run the Python File


