Testing ensures software reliability and helps in delivering high-quality applications indeed. It had reached a qualitatively new level. The emergence of powerful tools especially for managing the testing process and test automation tools are at its peak. Software testing is a method of lowering the risk of software failure. There are various tools to aid in the enhancement of testing quality.
What is Cloud Testing?
Moreover, cloud testing is the method of testing software applications using third-party Cloud service providers hence this can apply to cloud resource testing, SaaS (Software as a service) offers and the use of cloud tools as part of the Testing Strategy like SOASTA performance testing tool.
Why SOASTA Cloud Test Tool?
SOASTA Cloud Test – Cloud testing using SOASTA is a test management platform. acquired by Akamai. SOASTA Cloud Test is easy to use. And It can run any mobile phone/Web Application.
Additionally, its specialty is it can work load testing or performance testing under web applications and It can run on a single or multiple physical servers or in the cloud. Additionally, It is useful because of some other features as well.
Features
1) Explicitly tool has a Visual Playback editor and Visual test creation best interface.
2) In fact configurable dashboards will be provided and easy to use with real-time feedback.
3) The real-time statistics by SOASTA helps in increasing or decreasing load.
Simple Testing with Real-Time Analytics with Cloud Test Tool.
A) Simple Test Creation
Significantly easy to add the many conditionals’ loops with set parameters with good coverage, re-use the combined tests. The best thing is that it is possible without code for non-programmers.
B) High-Level Visual Play Back Editor
Additionally, visual playback editor is easy to use simply drag and drop your test cases into the tracks and they are executed on various cloud in their location with Only One or Two Simple Clicks.
C) Customizable and Analytical Dashboard
Further, it provides a great real-time experience. The dashboard displays the results of the test execution. An interactive real-time streaming dashboard collaborates multiple data points. The test is synchronized with the test timeline and displays the test result in the dashboard.
D) Secure Private Cloud Environment
Currently, everyone requires system security and wants to privatize our system environments, and the tool provides a secure and private test environment with internal load generators. Create multiple private labs for a private test environment in the virtual private cloud.
E) Dynamically Controlled and More Flexible
Additionally SOASTA provided a more flexible configuration with real-time analytics experience. This allows you to change your profile or settings dynamically. The good real-time dashboard analytics configures. All scenarios are tested and good monitoring is done.
How To do Performance Testing using Cloud test tool?
Follow the below mentioned steps to start performance testing with Cloud Test:
Step: 1 Download the Cloud Test Tool Conductor or Recording tool
Firstly download a compatible recording tool. Along with this, we recommend Conductor, it allows you to record directly into Cloud Test’s Clip Editor. Notably, you don’t have to transform data from your recording to a test clip.
Secondly, Download the Conductor within the Cloud test
1) Go to Resources
2) Click Download
3) Click Conductor
4) Follow some Installation Steps
Windows – Firstly click conductor in your systems tray, secondly select configure Configure the settings Like the below Image
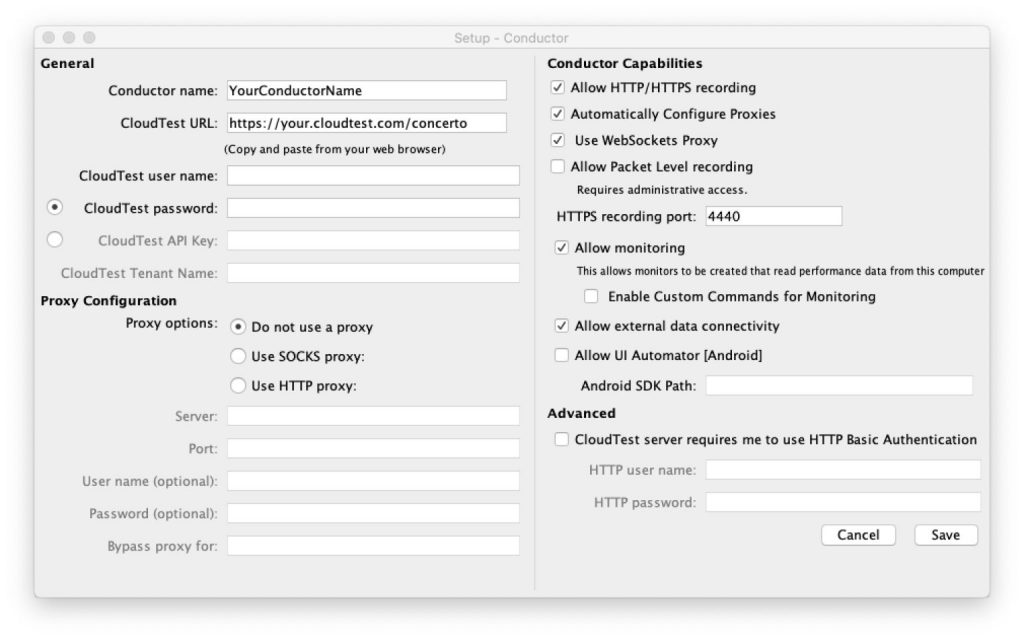
1) Firstly, give the name of your conductor
2) Test URL-Now simply copy your site URL
3) Next, enter your username and password.
4) Now test API key/Tenant Name – alternate option for authentication
Proxy Configuration
1) Do use a proxy – only for direct connections.
2) Socks Proxy – enable this if you are using port and server
3) HTTP Proxy – Enable this if you are using credentials with port and server.
Conductor Capabilities
1) HTTP/HTTPS Recording – To build a Cloud Test clip allow the conductor to record traffic instantly.
2) Automatically Configure Proxies – Overall allow this to modify your system itself. Furthermore, recording using a conductor involves reduced manual effort.
3) Web Socket’s Proxy – It is only available in HTTP Recording indeed.
4) Packet recording – Skip This.
5) HTTPS recording port – Enter Listen conductor port
6) Monitoring – Further allow this to read your performance data on your computer
7) Custom Commands Monitoring – Meanwhile try to read your commands on the monitor.
8) External data Connectivity – Enable this to easily monitor the third-party data. In conclusion, disable below other fields.
Advanced
Further Basic authentication to fill out the field with user name and password.
Step: 2 Record Your Test Scripts and Scenarios
Begin recording and after this simulate the behavior or scenario you want to test.
Recording Steps
1) After configuring your Conductor please Launch the Conductor application (SOASTA Conductor).
2) Login into the cloud test tool any browser you want (Edge, Chrome, Safari etc.)
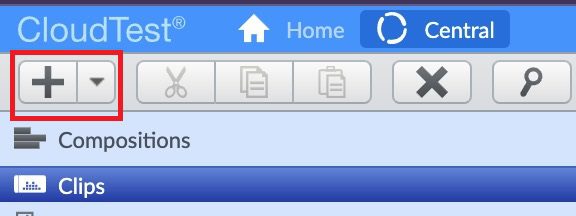
3) Go to central tab > Clips > Open the Clip editor > click new button in toolbar.
4) Click the record button Record HTTP.
5) Select Launched Conductor
(First make sure the Conductor status is connected.)
6) Click the record button at the bottom corner of the recording wizards.
7) Perform the steps you wish to be captured for your testing scenario in the new window. The recording’s test clip will appear at the centre.
8) Stop recording and go back to the first browser you opened and click the Record button to end the recording. Your clip is now saved in the center > Recordings list, where you can access it and start writing your test Script.
Step: 3 Arrange your test clips in order of application behavior
1) Create a test clip or test case manually
2) Create templates using wizards or Sessions Templates of Wizard
3) Verify the test is working as expected. Secondly, execute your test case examine your result details to ensure that it is working fine because it must be good as expected.
Step: 4 Configure how your test will be executed
You must configure how your test will be conducted after you have scripted it.For each track in your test,provide things like load distribution, percentages, locations, ramp plans, and more.
Step: 5 Test and Analyze in real time data
- Complete a recording and create a test clip.
- Test script arrangements and scenarios.
- Create a test composition to specify how it will be run.
Execute your Test
- Create a grid. Select an existing grid or build a new grid by going to Central > Cloud > Grids.
- Choose the number of servers and decide the place where they will be located.
- Set up the grid. Deploy instances is selected.
- To distribute your composition to the load generators, click Upload.
- To begin the test, press the play button.
Analyze Your Test and Stop Testing Properly
Firstly, analyze your test, secondly view the data real time dashboard and analyze your test result. Thirdly stop testing the proper way
Click Stop > Grid select Grid > tear down Instances
Step: 6 Generate the report and export
Coupled with the completion of the test execution, you can generate the reports
Generate report steps
1) Central > Result > List of Names
2) Right click on result> Create a new
3) Further Choose report template in Word and HTML format.
4) Furthermore select widgets include the reports and Click Ok
5) Additionally download there report download button appears
To summarize export the data steps
1) Central > Result > List of Names
2) Further right click on result and export as CSV format
3) Later on select data source which is in the dropdown menu (After selecting a data source, a description appears to the right.)
4) Click Ok and export the data
A place for big ideas.
Reimagine organizational performance while delivering a delightful experience through optimized operations.

Conclusion
To conclude all websites and applications need proper quality testing therefore the SOASTA cloud test tool with all the benefits gives you a great performance testing experience during real time analysis.
-
What is Cloud Testing?
-
Why SOASTA Cloud Test Tool?
- Simple Testing with Real-Time Analytics with Cloud Test Tool.
- A) Simple Test Creation
- B) High-Level Visual Play Back Editor
- C) Customizable and Analytical Dashboard
- D) Secure Private Cloud Environment
- E) Dynamically Controlled and More Flexible
-
How To do Performance Testing using Cloud test tool?
- Step: 1 Download the Cloud Test Tool Conductor or Recording tool
- Step: 2 Record Your Test Scripts and Scenarios
- Step: 3 Arrange your test clips in order of application behavior
- Step: 4 Configure how your test will be executed
- Step: 5 Test and Analyze in real time data
- Execute your Test
- Analyze Your Test and Stop Testing Properly
- Conclusion
-
Why SOASTA Cloud Test Tool?