Join us at GITEX 2025! Discover our solutions at Hall 4, Booth H-30 Schedule a Meeting Today.
Automate Marketing Initiatives with Salesforce Marketing Cloud Learn More
Join us at GITEX 2024! Discover our solutions at Hall 4, Booth H-30 Book your live demo today.

Apache JMeter vs Selenium: Which One Is The Best?

When it comes to choosing between Apache JMeter and Selenium, it can be hard to decide which is the best option.Both tools have their own unique advantages and disadvantages. Here, we’ll take a closer look at both of these options to help you decide which is the best for your needs.

Why Apache JMeter?

For load testing you can use Apache Jmeter tool. JMeter was initially developed to test applications, but it has expanded to several other test functions with several enhancements.

Also, its other usage includes to execute performance testing, functional testing, and load testing.

This below image indicates that how JMeter can perform Load Testing. As a result, it describes that every company sends a request to the client and receives the response.

It also includes load and stress testing as shown in the diagram below.

Picture1 1024x571 1

Steps followed during Load Testing with the help of Apache JMeter

1)  Launch JMeter

  • Goto the location where you have the JMeter directory.
  • Select the bin folder
  • Run the Jmeter .bat file
  • Apache JMeter will be launch in the GUI Mode

2)  Create JMeter Test Plan

  • We can start creating our test plan as soon as JMeter launches completely in the GUI Mode.

3)  Set up a Test Plan

  • Select File
  • Then select New option
  • On selecting new icon a new test plan will be display
  • Configure the test plan elements

4)  Create a Thread Group (Users)

  • Right-click on Test Plan from the Test Plan Tree View window.
  • Select Add.
  • Hover over the Threads (Users) Another window will display
  • Select Thread Group. The Thread Groupproperties will appear in the Editor window.
  • Configure Thread Properties: Number of Threads (Users), Ramp-Up Period, and Loop Count.
  • Add a Thread Group Name and specific test plan notes in the Comments field, if required

5) Configure Samplers

  • Hover your cursor over Add. A window will open to the right of the Add
  • Hover your cursor over Sampler. A drop-down menu will appear will all the Sampler options.
  • Select the HTTP Request Sampler.
  • Add a name for your HTTP Request sampler in the Name
  • Add the specific protocol (HTTP or HTTPS)
  • Enter the Server Name or IP address
  • The default request type is set to GET, but we can also change the request type (POST, HEAD, PUT, PATCH, etc.

6)  Add Listeners

  • Right click on the Thread group
  • Hover the cursor over Add
  • Select the Listener from the list
  • We can add multiple listeners like tree and view listeners

7) Run Load test and Analyze the results

  • Your test plan is ready to go as soon as you add the Thread group, Samplers and Listeners

8) Run JMete

  • First you have to save your test plan by selecting file and save from the top left corner
  • Click Start from the Run menu
  • Click the Run icon from the toolbar
  • Wait for the test to run and finish
  • Once done it will display the result

You will see the test results in the Test Plan window

  • The Sample #represent the number of runs, or users.
  • Start Time for each Thread.
  • Thread Name for each run and user.
  • Sample Time is the time you take for each request.
  • Status. Green checkmark indicates it has passed. A red checkmark indicates a failure.
  • Additional metrics, such as Bytes, Sent Bytes, and Latency are also included

Here are some reasons why we should go with JMeter?

  1. Free of cost: JMeter is an open-source application and it does not apply any cost.
  2. Platform Independent: Since it is a Java-based application. So, we can easily run on different platforms.
  3. Multiple Supports: JMeter not only supports performance testing but non-functional testing such as Stress, Web Development Service, and Distributed.

Steps followed during STRESS Testing with the help of JMeter

  1. Plan the Stress Test: In this step, we can gather the system data analyze the system and define stress goals.
  2. Create Automation Scripts: In this step, we are going to create test automation scripts and]generate the test data for the stress scenarios.
  3. Script Execution :In this step, we run the Stress testing automation scripts and store the stress results.
  4. Results Analysis : After storing the results, now you need to analyze the Stress Test results and identify bottlenecks
  5. Optimization: In this final step, configurations are changed to meet the desired benchmarks.

Now, let’s move to Stress Testing tools

  1. Distributed Stress Testing: In distributed client-server systems, you can perform testing across all clients from the server
  2. Application Stress Testing: This testing is used for finding defects related to data locking and blocking, network issues and performance bottlenecks in an application.
  3. Transactional Stress Testing: It is used for fine-tuning and optimizing the system.
  4. Systematic Stress Testing: This testing is integrated and can be tested across multiple systems running on the same server
  5. Exploratory Stress Testing: This is used to test the system with unusual parameters or conditions that are unlikely to occur in a real scenario. You can find the defects in any critical situation.

A place for big ideas.

Reimagine organizational performance while delivering a delightful experience through optimized operations.

Why Selenium?

Selenium is used for cross-browser testing. With the help of Selenium, we can easily automate the testing across various web browsers. Like Chrome, Mozilla Firefox, Safari and Internet Explorer.


Let’s first understand what selenium is and why it is used?


Being one of the best tools for automation testing, Selenium is well-loved by developers and testers across the globe.

But the question that remains is that there are many automation testing tools available in the market that delivers almost the same results. So, why only Selenium?

There are many advantages of Selenium as compared to other testing tools.

1) Framework Support: When someone chooses any tool the first thing that comes to mind is: “Does this tool supports the language that I know”.But there is nothing like this. Selenium supports all programming languages like Java, Python, JavaScript, C#, Ruby, and Perl.In selenium, we can write our scripts in our own programming languages and it converts into selenium compatible code.

2) Multiple browser support: While using selenium, we don’t have to worry about browsers because it can support all kinds of browsers like chrome, safari, Mozilla, IE.

3) Open Source Availability: Selenium can be publicly accessible in the market free of cost.

4) Multiple Operaing Systems: Selenium is a portable tool and it supports various operating systems as everyone has a different OS and it is the an important thing is that each automation tool should support each OS.


5) Parallel Test Execution: The main goal of any automation tool is to save time and effort. With the help of the Selenium grid, we can easily execute test cases parallel.

But, to use the selenium and write our test scripts we must have IDE/Editor. In case of IDE/Editor, Eclipse is the commonly used by everyone.

Now, we go through the Prerequisites & Installation

1) Download and Install Java 8 (you’ll need to have Java 8 to use Selenium 3)

2) Download IDE / editor (To Create and run your tests)

3) Download Selenium Webdriver.

And you must have to choose your browser to execute your test scripts. The one thing that you need to keep in your mind is Selenium 3 version is not supported by Mozilla fully. But if you want to write your test-scripts in Mozilla so you need to install theGeckodriver. But, we can also use the different browsers like Chrome, IE, Edge, Safari.

If you want to execute your script on Chrome Browser, this syntax will :

System.setProperty(“webdriver.chrome.driver”, “path of chromedriver.exe”); WebDriver driver = new ChromeDriver();

If you want to execute your script on FirefoxTo run your test scripts with Firfox, you need to install Java Development Kit>>Eclipse>>.

You can check in Eclipse from Window->Preferences options, if java is installed and configured successfully on Eclipse.

You can also check the java version from command prompt, enter ‘java -version’ which will display the java version installed on your machine.

Now we will start creating our first program in selenium using java from Eclipse Editor.

Now start writing First example to launch Firefox browser using Selenium Webdriver java

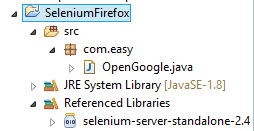
    1. Create new Java Project
      [From top menu file->New->Project/Java Project and enter the project name]
    2. Further Create a new Package under Project
    3. Create a new Java class file under the Package
    4. Next add the selenium server Jar files to the Project.[Right click on the Project Name, Mouse over on Build Path and select ‘Configure Build Path’, Select Libraries tab, Click on Add External Jars and select the selenium server jar from your local machine]
    5. Write the script in the Java and execute it by right clicking on the program and Run as Java Program.

Conclusion

Choosing a single tool could be difficult because each one has different purpose. JMeter and Selenium are both used for web application testing. But the main difference is that JMeter is mostly used to test the performance of web applications under load and stress. On the other hand, Selenium is best suited for automation and cross browser testing of a website. Based on the requirement of the project, people can choose both JMeter and Selenium if these tools delivers and fulfill the requirement.

Top Stories

Advanced Gantt Scheduling in Odoo
How to Set Up Advanced Gantt Scheduling in Odoo — Complete Guide
Advanced project scheduling inside Odoo does not require exporting to MS Project or maintaining a separate timeline tool. The Zehntech Odoo Advanced Gantt App for Project adds dependency types, automatic cascade, critical path visualization, resource workload management and baseline tracking to your existing Odoo projects — in under 10 minutes.
ai automation for small business
How Small Businesses Can Use AI Automation to Save 10+ Hours a Week without Coding
AI automation for small businesses is simpler than most owners expect. The tools exist, they are affordable, and none of them require coding. What most businesses lack is not access — it is a clear starting point.This guide provides that. It covers which tasks to automate first, which no-code tools
Odoo Tansforming business oprations
How Odoo is Transforming Business Operations in 2026 And Why Companies Are Switching Fast
In 2026, businesses are under constant pressure to do more with less—reduce costs, improve efficiency, and scale faster than ever before. Yet, many companies are still stuck with disconnected systems, manual processes, and outdated ERP solutions. This is exactly why Odoo ERP for business operations is gaining massive traction. Companies
Step-by-step guide to setting up Manufacturing Gantt Scheduling in Odoo — Zehntech
How to Set Up Manufacturing Gantt Scheduling in Odoo — Step-by-Step
Manual exports can work — for very small teams with low-frequency reporting needs. If your team reports monthly, uses a single Odoo module, and has an analyst with spare time, a manual export process is adequate. But for most Odoo teams reporting weekly or more frequently, there is a measurable
Best shopify odoo connectors
Best Shopify Odoo Connectors in 2026 — What Actually Works
If you are looking for a Shopify Odoo connector in 2026, you have three realistic paths: install a dedicated connector from the Odoo App Store, commission custom development, or continue running manual data entry between platforms. Each option has a legitimate use case. This article compares all three honestly —
Odoo shopify connector
Odoo Shopify Connector vs. Manual Data Entry — Which Is Right for Your Business?
Manual exports can work — for very small teams with low-frequency reporting needs. If your team reports monthly, uses a single Odoo module, and has an analyst with spare time, a manual export process is adequate. But for most Odoo teams reporting weekly or more frequently, there is a measurable

          Success!!

          Keep an eye on your inbox for the PDF, it's on its way!

          If you don't see it in your inbox, don't forget to give your junk folder a quick peek. Just in case.


              You have successfully subscribed to the newsletter

              There was an error while trying to send your request. Please try again.

              Zehntech will use the information you provide on this form to be in touch with you and to provide updates and marketing.