


Automate Marketing Initiatives with Salesforce Marketing Cloud Learn More

How to Build a Chat Application Without a Backend? 

I know, after reading the title, a lot of questions must have come to your mind how can a chat application build without a backend. But you read it right. We can build a chat application without using the backend!

In this article, we will cover the components that will be needed to build it.

Firstly, let’s go through the importance of chat applications in the current era. Nowadays, communication plays an important role in building relationships in business, social, and personal life. For instance, chat applications are one of the forms of communication. Almost everyone uses chat applications in any form, like personal chat, business communication etc.

To integrate chat applications on your website or in web applications, you either have an option to integrate third-party libraries which is quite costly in a long run. Or you can build an application using traditional approaches like having a backend and all the middleware components. 

Areas Where Chat Applications Play an Important Role

  • Hotels and Food Delivery sectors
  • Banking Sector 
  • Social Media 
  • Railways 

The Components We Will Use To Build This Application

We will use the following application for building a chat application from scratch: – 

  • Angular 
  • AWS AppSync 
  • GraphQL 
  • AWS Dynamo DB 
  • AWS Cognito 

Let me give you a brief introduction to all these components. 

Angular – Angular is an application framework and development platform for creating efficient single-page apps. 

AWS AppSync – AWS AppSync is a fully managed service that makes it easy to develop GraphQL APIs. By handling the heavy lifting of securely connecting to data sources like AWS DynamoDB. 

GraphQL – GraphQL is a query language for APIs and a runtime for fulfilling those queries with your existing data. It is an application layer server-side technology which is developed by Facebook. 

AWS Dynamo DB – AWS Dynamo DB is another AWS service that provides us with ways to save data in NoSQL form. It is a fully managed, server less, key-value NoSQL database. This is designed to run high-performance applications at any scale. And in a chat application, we need performance and scalability both. 

AWS Cognito – Amazon Cognito helps you add Authentication and authorization to your web and mobile apps quickly and easily. It provides us with 30+ methods. This give us full control of user authentication and authorization. 

The Architecture We Follow to Implement a Chat Application Without a Backend

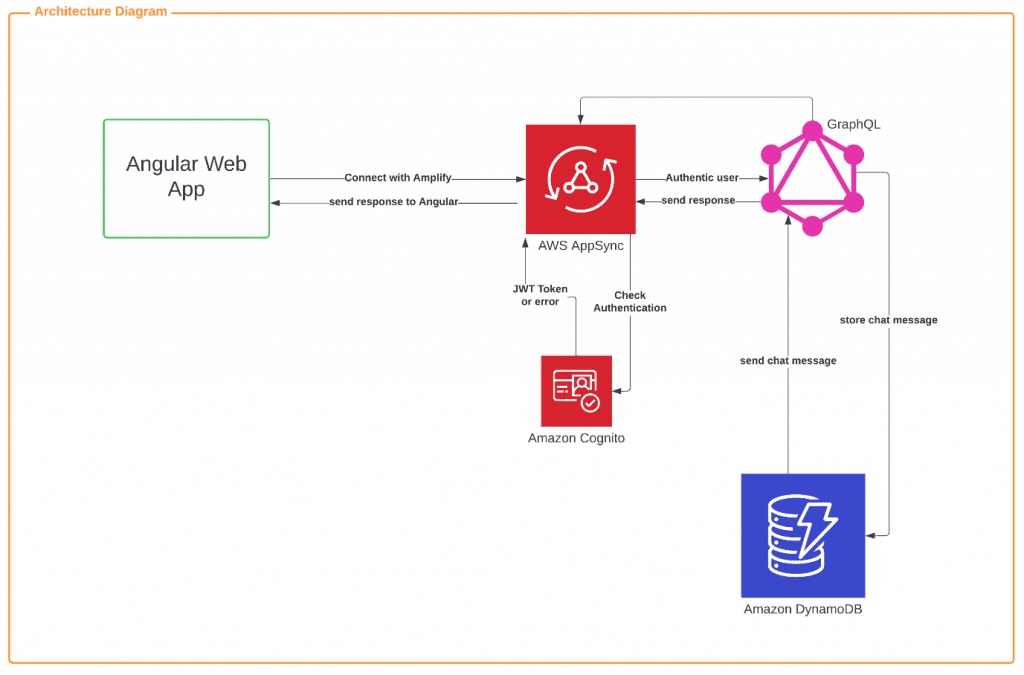
image 9
Let me explain to you the above architecture
  • First, you need an angular library. That will provide you ways to connect with AWS Amplify i.e., aws-amplify, aws-amplify-angular. 
  • AWS amplify provides you with ways to connect with AWS App Sync. It provides us GraphQL Schemas and resolvers to connect to a Dynamo DB. 
  • AWS Amplify provides you ways to connect with Amazon Cognito, which will help you to register and authenticate users. You need a amplify authenticator component which has class Auth which will help provide us various methods like signup, signin, signout, forgot password, Check out the complete API here
  • Once the user is authenticated successfully you can initial chat and store and retrieve from Dynamo DB. For that, you need to create a schema, mutations, subscriptions, and queries which will help you to save data and retrieve data from Dynamo DB.
    • Schemas: It is the most basic component of GraphQL which represent a kind of object you fetch from a service. Example: 
type ChatTable = {
  __typename: "ChatTable",
  id?: string | null,
  message?: string | null,
  sender_id?: number | null,
  receiver_id?: number | null,
  assets_id?: string | null,
  created_date?: string | null,
  updated_date?: string | null,
}

Mutations: Mutations are special because they define the entry point of every GraphQL query. For example, whenever a writes operation occurs it should send explicitly via a mutation.


type CreateChatTableMutation = {
  createChatTable?:  {
    __typename: "ChatTable",
    id?: string | null,
    message?: string | null,
    sender_id?: number | null,
    receiver_id?: number | null,
    assets_id?: string | null,
    created_date?: string | null,
    updated_date?: string | null,
  } | null,
}

Subscriptions: Subscriptions are the most special operation it will keep on listening to the mutation whenever any mutation happens it runs an operation based on it. Send the response to UI. For example, when someone enters a new chat, it listens and sends the response to UI that the new chat initializes.


type OnCreateChatTableSubscription = {
  onCreateChatTable?:  {
    __typename: "ChatTable",
    id?: string | null,
    message?: string | null,
    sender_id?: number | null,
    receiver_id?: number | null,
    assets_id?: string | null,
    created_date?: string | null,
    updated_date?: string | null,
  } | null,
}

Queries: Queries will help you with crud operation please find the example below for getting requests.


  query ListChatTables(
    $filter: TableChatTableFilterInput
  ) {
    listChatTables(
      filter: $filter
    ) {
      items {
        id
        message
        sender_id
        receiver_id
        assets_id
        created_date
        updated_date
      }
    }
  }
`

Advantages and Disadvantages over Rest Framework

  • Advantages

    • Nowadays performance of an application in terms of speed is a major concern and what this architecture solves is it reduces execution time. You can fetch data with a single GraphQL API call. Also, as it runs in the application layer, so the middleware complexity reduces.
    • Easier and faster to build applications.
    • Only pay for the services you use.
    • Modern UI-driven approach to building applications.
    • It provides web-based analytics.
  • Disadvantages

    • Lack of resources for the complex calculation.
    • Missing design pattern for a complex application.
    • It does not based on the HTTP caching methods that enable storing request content.
    • Overkill Cost for small applications.
    • When using AWS Amplify, you cannot distribute load balancers.

A place for big ideas.

Reimagine organizational performance while delivering a delightful experience through optimized operations.

Conclusion

To sum up, I have covered all the components which will help you to build the real-time chat application without the backend. Therefore you can build fast and reliable applications with a modern UI template. In today’s era execution time plays an important role. And to achieve this we can capitalize the power of AWS App Sync. It’s little expensive but it provides fully secured and scalable chat application. That too without overhead of managing the backend. This makes it cost effective chat development option.


Top Stories

How to Connect Odoo to ShipStation — Step by Step Setup Guide
How to Connect Odoo to ShipStation A Step-by-Step Setup Guide
This guide walks you through connecting Odoo to ShipStation using the Zehntech Odoo ShipStation Connector — from generating your API credentials in ShipStation to your first automated order push and tracking import. Most setups take under 10 minutes. Prerequisites Before you begin: Odoo version: v17, v18 or v19 (Online, Odoo.sh
AI Agents Are Transforming Odoo ERP Operations in 2026
How AI Agents Are Transforming Odoo ERP Operations in 2026
Most ERP systems already hold the information needed to make better decisions. The problem is the work between the data and the decision: opening several modules, filtering records, exporting spreadsheets, comparing numbers and then updating Odoo manually. AI agents are beginning to remove that gap. Unlike a chatbot that only
Connect Odoo & Shopify Automatically in 2026
How to Connect Odoo and Shopify Automatically (2026 Guide)
If you're running Shopify for your storefront and Odoo for everything behind it — inventory, accounting, fulfillment — you already know the two don't talk to each other out of the box. This guide walks through exactly how to connect them so orders, stock, and customer data sync automatically, with
Odoo Hubspot Connector
How to connect hubSpot to odoo a step-by-step setup guide
This guide walks you through connecting HubSpot to Odoo using the Zehntech Odoo HubSpot Connector from generating your API key in HubSpot to your first live sync. Most teams complete this in under 10 minutes. Prerequisites Before you begin: Odoo version: v16, v17, v18 or v19 (Online, Odoo.sh or On-Premise)
Odoo AI: How AI Agents Are Automating Business Operations in 2026
Odoo+AI: How AI Agents Are Automating Business Operations in 2026
Your Odoo system knows everything about your business. It knows which products are below reorder level right now. It knows which purchase orders are overdue. It knows which outlets sold below target yesterday and which customers are approaching their credit limit. Your team does not know any of this until
Odoo AI Integration 2026
Odoo AI Integration 2026 — Complete Guide
Most businesses running Odoo treat AI as a separate tool. ChatGPT for content, a BI tool for reporting, Odoo for operations — and someone spending hours every week moving data between all three by hand. That is the gap this guide addresses. How Odoo AI integration actually works in 2026,

          Success!!

          Keep an eye on your inbox for the PDF, it's on its way!

          If you don't see it in your inbox, don't forget to give your junk folder a quick peek. Just in case.


              You have successfully subscribed to the newsletter

              There was an error while trying to send your request. Please try again.

              Zehntech will use the information you provide on this form to be in touch with you and to provide updates and marketing.