




Join us at GITEX 2025! Discover our solutions at Hall 4, Booth H-30 Schedule a Meeting Today.
Automate Marketing Initiatives with Salesforce Marketing Cloud Learn More
Join us at GITEX 2024! Discover our solutions at Hall 4, Booth H-30 Book your live demo today.

Creating SPFx Web Parts: Key Tip

Sharepoint Framework

The SharePoint Framework (SPFx) is a web page and web part-based model. It offers complete assistance for client-aspect SharePoint development,  clean integration with SharePoint records,  and extending Microsoft groups. 

Further, we’ll learn how to make a web part with SharePoint Framework and how to create our first SPFx web part.

Setting Up SPFX Development Environment

Install:  
1.node js 
2. Install any code editor that supports client-side development to create webpart: like Visual studio code
3. yeoman and gulp: npm install -g yo gulp 
4. Yeoman SharePoint generator: – npm install -g @microsoft/generator-sharepoint 

To get the node, gulp, and yeoman versions used: –  npm list -g –depth=0 

Screenshot 418 1024x193 1

Create the First Web Part

Web components are UI blocks that can be shown on a SharePoint page. 

By following the guidelines, let’s create a new  SPFx web part project.

  • Open the command prompt and
  • Create the folder where you want to create your webpart solution: md demoWebpart 
  • Enter in the folder: cd demoWebpart 

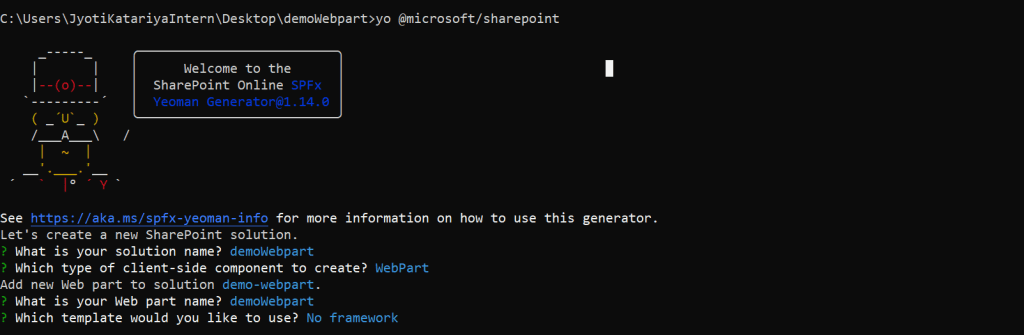
Further, to create a new solution on the present location, use the following command in the terminal yo @microsoft/sharepoint

After that generator will ask for the following user input: 

  • What is your solution name? (spfx-webpart): demowebpart 
  • Which type of client-side component to create?: webpart 
  • What is your Web part name?: demoWebpart 
  • Which template would you like to use: noframework 
Screenshot 420 1024x335 1

Following this procedure, your demo Web Part will be created. Further, we can test the Web Part on a workbench after creating the solution.

Use gulp serve to test the web part on the workbench.

To deploy the build: 
gulp bundle –ship 
gulp package-solution –ship 

A place for big ideas.

Reimagine organizational performance while delivering a delightful experience through optimized operations.

Web Part Using React Framework:

React components contain many functionalities and provides ability to receive properties. Components can transfer information among each other through properties. As a result, in this way you can control which view of web part will be display at any specific time slot.

For instance, the multiple views are built individually to make the programming and maintenance easier. Further, this also makes it easy for a group of developers to work on the same web part at the same time. Meanwhile, splitting the multiple views into independent React components, on the other hand, allows switching between them much easier. 

Creating Web Part Using React Framework:

yo @microsoft/sharepoint

What is your solution name? (spfx-webpart): webpartWithReact 


Which type of client-side component to create?: webpart 


What is your Web part name?: webpartWithReact 


Which template would you like to use: React

After this, your web part will be created.

In webpart, three files are created in src/webpart/component 


WebpartWithReactProp.ts: in this, we declare the properties 


WebpartWithReact.tsx: in this, we can use properties that are declared in WebpartWithReactProp.ts file 


WebpartWithReact.module.scss: write the CSS


Therefore, SharePoint web parts provide functionality for web developers to create an extremely efficient and user-friendly solution. 

Further, Web parts can display lists and libraries, data from external data sources, and content from other sites.


 To sum up, with versatility and inter-combinability SharePoint web part is an immensely powerful means to build up the content.

Top Stories

Odoo direct printing workflow showing one click printing without PDF download or printer selection (1)
The Hidden Cost of Printing from Odoo — And How to Fix It
Every invoice, picking slip and delivery order printed from Odoo goes through the same cycle: click print, wait for the PDF to download, open the file, go to File → Print, select the correct printer, click print again. Six steps. Every document. Every day. For a single team member printing
Appointment Booking
How to Set Up Appointment Booking in Odoo — Complete Setup Guide
Setting up online appointment booking in Odoo does not require a developer or a third-party scheduling tool. The Zehntech Odoo Appointment Booking app gives you a live 24/7 booking page, real-time calendar sync, and automated confirmations — all inside your existing Odoo instance.This guide is for business owners, Odoo administrators,
Advanced Gantt Scheduling in Odoo
How to Set Up Advanced Gantt Scheduling in Odoo — Complete Guide
Advanced project scheduling inside Odoo does not require exporting to MS Project or maintaining a separate timeline tool. The Zehntech Odoo Advanced Gantt App for Project adds dependency types, automatic cascade, critical path visualization, resource workload management and baseline tracking to your existing Odoo projects — in under 10 minutes.
ai automation for small business
How Small Businesses Can Use AI Automation to Save 10+ Hours a Week without Coding
AI automation for small businesses is simpler than most owners expect. The tools exist, they are affordable, and none of them require coding. What most businesses lack is not access — it is a clear starting point. This guide provides that. It covers which tasks to automate first, which no-code
Odoo Tansforming business oprations
How Odoo is Transforming Business Operations in 2026 And Why Companies Are Switching Fast
In 2026, businesses are under constant pressure to do more with less—reduce costs, improve efficiency, and scale faster than ever before. Yet, many companies are still stuck with disconnected systems, manual processes, and outdated ERP solutions. This is exactly why Odoo ERP for business operations is gaining massive traction. Companies
Step-by-step guide to setting up Manufacturing Gantt Scheduling in Odoo — Zehntech
How to Set Up Manufacturing Gantt Scheduling in Odoo — Step-by-Step
Manual exports can work — for very small teams with low-frequency reporting needs. If your team reports monthly, uses a single Odoo module, and has an analyst with spare time, a manual export process is adequate. But for most Odoo teams reporting weekly or more frequently, there is a measurable

          Success!!

          Keep an eye on your inbox for the PDF, it's on its way!

          If you don't see it in your inbox, don't forget to give your junk folder a quick peek. Just in case.


              You have successfully subscribed to the newsletter

              There was an error while trying to send your request. Please try again.

              Zehntech will use the information you provide on this form to be in touch with you and to provide updates and marketing.