Automate Marketing Initiatives with Salesforce Marketing Cloud Learn More

A Quick Guide to Salesforce Apex

Firstly, let’s discuss the meaning of Apex. It is an associate degree in object-oriented artificial language that enables Salesforce developers to execute the flow. Likewise, dealing with management statements on the Salesforce Lightning platform server in conjunction with calls to the Lightning Platform​ API.

Victimization syntax that appears like Java and acts like info hold-on procedures. Further, it allows developers to feature business logic to most system events, button clicks, connected record updates, and Visualforce pages. Internet service requests initiate it from triggers on objects.

Salesforce Apex Key Features

Integration

Its coding provides integral support for the common Lightning Platform, including:

  1. Information manipulation language (DML) calls, like INSERT, UPDATE, and DELETE, embody integral Exception management.
  2. Inline (SOQL) Salesforce Object query language and Salesforce Object search language (SOSL) query comes with lists of sObject records.
  3. The iteration that enables the bulk process of multiple records at a time
  4. Custom public API calls which are engineered from hold on Apex strategies
  5. Apex references warnings and errors are issued once a user tries to edit or delete a custom object or field.

Easy to use

It relies on acquainted Java idioms, like variable and expression syntax, block and conditional statement syntax, loop syntax, object, and array notation. Wherever Apex introduces new parts, it uses syntax and linguistics that are simple to grasp and encourage economical use of the Lightning Platform. Therefore, it produces elliptical code further as simple to jot down.

Data targeted

The Apex coding intends to thread along with multiple queries and DML statements into one unit of labor on the Salesforce server. Developers use DB hold-on procedures to equally thread along with multiple action statements on a DB server.

Rigorous

This could be a powerfully typewritten language that directly references schema objects like objects and field names. It stores all custom fields, objects, and class dependencies in metadata to ensure they’re not deleted when needed by active Apex code. At compile time, It fails quickly if any references are invalid.

Hosted

Apex interprets, executes, and controls entirely by the Lightning Platform.

Multi Tenant aware

Like the whole of the Lightning Platform, Apex runs in multi tenant surroundings. Any code that violates the limit fails with easy-to-understand error messages. So, the Apex runtime engine intends to protect against runaway code, preventing it from monopolizing shared resources.

Easy to check

It provides integral support for unit check creation and execution. Includes check results that indicate how much code is roofed and that elements of your code might be a lot more economical. Salesforce ensures that the custom Apex code works by executing unit tests before any platform upgrades.

Salesforce Apex Core Construct to Understand

jnQLGewI6uB7aRkvVDkzjnJ 6PnRGzRpGfGs2lTSNMuf0BuxbJGZE2hRLbzt0uu kNM74v5sfs1gEtt9w 8ynN EWSQqFmsPuolpMdGL2 F t0f1vvv7sNY9CCQQPIO2ZmtaVX7s3d6FkC6DsA

Writing Apex via Development Environments

For developing Apex code there are many development environments. This section guide will discuss the Developer Console, which permits you to write down, test, compile, and debug your Apex code.

Developer Console

Its an associate degree integrated development surroundings with various tools you’ll use to make, debug, and check applications in your Salesforce organization. These tasks are supported.

Writing code

You’ll add code via the source code editor. And browse packages in your organization. 

Compiling code

Once a trigger or class is saved the code gets automatically compiled. Console will be reported about any compilation errors. 

Debugging

Correct logs and set checkpoints will be read by you that aid in debugging.

Testing

Execute checks of specific test categories or all tests in your organization, and you’ll read check results. Also, you’ll examine code coverage.

Checking Performance

Further, Examine correct logs to find performance bottlenecks. 

SQL queries

Able to query data in your organization and look at the results using the query Editor.

Color cryptography and autocomplete

The source code editor uses a color scheme to understand the code and inbuild method quickly, provides autocompletion for class and method names on saving, and throws the errors if found.

Create a Custom Object

From the management settings for custom objects, if you’re using Salesforce Classic, click New Custom Object, or choose to Create > Custom Object in case of lightning expertise. 

  1. Enter Book for the label.
  2. Along with this you have to enter Books for the plural label.
  3. Click Save. Ta-dah! You’ve currently created your 1st custom object. Now, let’s produce a custom field.
  4. In this section of the Book detail page, click New.
  5. Select Number for the data type and then click to Next.
  6. Enter the value for the field label.
  7. After this Enter sixteen within the length text box.
  8. Two has to be entered within the decimal places text box, and click on Next.
  9. To accept the default value for field-level security click on next.
  10. Then select Save.

You’ve created a custom object known as Book and added a custom field to the custom object. These have already got some standard fields, like Name and CreatedBy, and permit you to feature alternative fields that area unit a lot of specific to your implementation. For this tutorial, the value field is an element of our Book object and is accessed by the Apex class you may write within the next step

Adding an Apex Class

Here, we will add an Apex class that contains a method for updating the book price. The trigger calls this method that you will be adding in the next step.

From the Setup, enter “Apex Classes” in the Quick Find box, then select the Apex Class and click to New.

In the class editor, enter the following class definition:

sQN1n pvRtIO5PajP1LgLxWGMKztreJ2ecbPusSHfNj5StjTeR2b97FrXL93P6ZSiLsBHJmeUeleq4pD 5wCn7Yfum7mgJsigUwu0yi9DaYZ2j2fGIe9QkjT9 pxsOi2IW buG17Bl5nKteJug

A place for big ideas.

Reimagine organizational performance while delivering a delightful experience through optimized operations.

The previously mentioned code is the class definition to which we are going to add one method in the coming step. The Salesforce API is usually contained in the classes.

It is defined as public, which means the class is available to other Apex classes and triggers. 

The above method definition between the class opening and closing brackets.

9SlwWEMrSRhhMru5 xi4xZ2oqwonxha7vmb7er Hu8kEkEDUAGKsHo7Aw36oT cTWV1 SEYdu1s5Vnz6RqiSQzP2hQe YLSnyo CELRnavJu2Rh0EGPQy11O9lYvTgyIqsnBIzhkp42hP65N7g

This is called applyDiscount and can be both public and static. You can use the name of the class followed by a dot (.) and then the name of the method you need.


Just because it’s a static method, there is no need to create an instance of the class to access the method.


One parameter by above method, a list of the Book records assigned to the variable, books. The suffix __c in the object name Book__c indicates that it is a custom object that you have created in Salesforce. Some standard objects provided in the Salesforce application, like 


Account, don’t end with this postfix __c. Now, The next section of code contains the rest of the method definition:

CvX 93i 5vy7yZ6enYI3NmMvt6Xy7CX51G73Bz6MBGPzimsvpEtc4KVgIR7ANIbt7PnLhOZndFsY4 tjOj62F0XTNyuVCLvZl XjNXkC4kuE9HoyJZWKNDJ8 XJvEKgCqgU ES8kbWQpq6Gfzg

Notice the __c after the name of the field Price__c. This indicates that it’s a custom field that you have created. Standard fields are provided by default in the Salesforce and are accessed using the same type of dot(.) notation but without the suffix __c. for example, the Name field doesn’t end with __c in Book__c.Name as this field is standard. The statement b.Price__c *= 0.9; takes the old/existing value of the b.Price__c, and multiplies it by 0.9, which means that its value will be discounted by 10%, and then stores the new value into the b.Price__c field. The *= operator is a shortcut. Now, Another way to write this statement is b.Price__c = b.Price__c * 0.9.

Click the option Save to save the newly created class. It would be best if you now had a whole class definition like this.

GAXTn4l2tBepAdPynMV83 dKB5Z2D1FkwnSMNsVEYZ73vUHI JezqRpzXb C3ZRnO9V3pFDa5lqj69ZfRboivm1yjCtjdUXtEjwbYviSnCouMw0mj7LdVihum k7JvTIKvKQHc uVgfQy6Aj Q

We have a class containing some code that iterates over a list of books and updates the Price field for each Book.

This code is a part of the apply Discount static method called through a trigger you will create in the next step.

Add an Apex Trigger

For the custom object Book__c a trigger is created that calls the applyDiscount method of MyHelloWorld class that we made in the previous step. 


It executes before or after records of a particular type of CRUD operation from the Lightning platform.

Each of these triggers runs with a specific set of context variables that access the records that cause the trigger to fire.

They process several records at once.


From the settings called object management for books, go to Triggers and then click New. 

In the trigger editor, replace the default template code with this trigger definition:

apk9wnUyeIeHpLCleWJOOaKjL7yRFISpGK12239fUkeElVrHHj6u7EzKICP3QOtoe pmg1gb6zn HGZ m Z3WgI720RB gTJZTNqFp0pBQ8uJzHh YvbWyMgO5468uLPaCPFSF5kyQkvK imXA

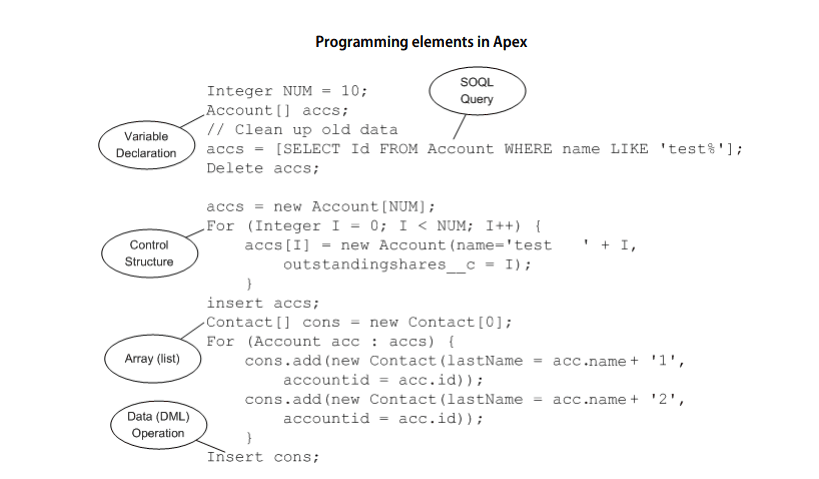
The very first line of the code defines the trigger:


As a result it gets a name, specifies an object on which it operates, and defines the events that cause it to fire. For example, the trigger is called HelloWorldTrigger, operates on the object Book__c, and runs before the new books are inserted into the database. 

Further in Next line of the trigger creates a list of book records named books and assigns it the contents of the trigger context variable, called Trigger.new. These are implicitly defined in all triggers and provide access to the records that cause the trigger to fire. It contains all the latest books about to be inserted in the current case.


The Following line of code calls the method applyDiscount in the class MyHelloWorld. It passes in the new books array. 


Hence you have all the code to update the price of all books and insert them. Although, there is still one piece of the puzzle missing. Unit tests are an essential part of writing the code. You will see why this is so, and then you can add a test class to complete all the actions.

Add a Test Class

Meanwhile, with a test method we will add a test class. It exercises and validates the code in the trigger and class.

Also, it enables you to reach 100% code coverage for the trigger and class. You can also run the test and verify code coverage. 

Note: Testing is an integral part of any development process. Before deploying the Apex or packaging it for the Salesforce AppExchange the following must be confirmed:


Unit tests must cover at least 75% of your Apex code, and all of those tests must complete successfully. Note the following.

 – When deploying Apex to a production organization, each unit test in your organization’s namespace is executed by default.

– Calls to System.debug don’t form as part of Apex code coverage.

– Test methods and classes don’t come it.

– While tests must cover only 75% of your Apex code, don’t focus on the percentage of covered code. Instead, be sure that each use case of the application is covered, including the positive and the negative case and bulk and single records. This approach ensures that unit tests cover 75% of your code. 

Every trigger must have some test coverage.


Successful compilation of All the classes and triggers is necessary.


  1. From the Setup, enter “Apex Classes” in the Quick Find box, select the “Apex Classes,” and click the New option. 
  2. Add this test class definition in the class editor and click Save.
jucdCKABHS7vqaYcyYuv9a3zu7weBBbDDDByX PTthtjx7iid8sQVX5B qYoX2Mq5IYC sP5FqdxZm7klD1LhAG Pwsic1a1W kC6wWzOFylNBvyZiK0ERRwAd1RaSFebywx1 c5fK6ljPxkPA

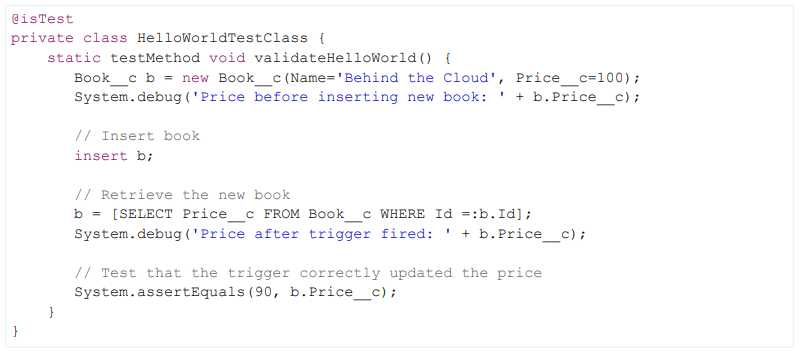
@isTest annotation is used to define it. Classes defined this way should only contain test methods and any methods required to support these test methods. One of the advantages of creating a separate class for testing is that classes defined with is Test don’t count against your org’s limit of 6 MB of Apex code.

You can also add the @isTest annotation to individual methods. Method validateHelloWorld is defined as a testMethod. This annotation means that if changes are made to the database, the annotation rolls back after the execution completes.

No need to delete any test data created in the test method.

First, a book is temporarily created and inserted into the database. The System debug statement writes the price value in the debug log.

Newly inserted Book will be retrieved by the the, by the assigned ID. The System debug statement then logs the new price that the trigger modified.

When MyHelloWorld class runs, it executes the updates of the Price__c field and reduces its value by 10%.

The following test verifies that the method applyDiscount ran and produced the expected result.

 
  • To run it and view the code coverage details, switch to the Developer Console. 
  • Here, follow Test > New Run
  • Click HelloWorldTestClass and select your TestClass.
  • To add all of the methods in the HelloWorldTestClass to the test run, click the Add Selected
  • Go to Run 


The test results display in the Tests tab/section. Further view details about the methods which ran by expanding any of the test classes in the Test tab. In the current case, the class contains only one test method.

  1. Overall Code Coverage tab shows the coverage of your test class. To view the % of lines of your code in the trigger covered by the test, which may be 100%, double-click on the code coverage line for the HelloWorldTrigger. A method is called from the MyHelloWorld class; this class also has full coverage (100%). To view it, double-click class.
  2. Go to the Logs tab and double-click the most recent logline in the logs list to open the log file. The execution of log displays, including the logging information about the trigger event, that call to the applyDiscount method, and the price before and after the trigger.


Finally, we have completed all the necessary steps for writing a bit of Apex code with a test class that runs in your development environment.

In the next step, We will discuss the deployment of the code and the custom object you’ve created. After testing your code and being satisfied with the result, you can deploy your code and any of the prerequisite components to the production org.

Deploying Components to Production


Finally, we have completed all the necessary steps for writing a bit of Apex code with a test class that runs in your development environment.


  • From the Setup, enter Outbound Change sets in the Quick Find box, then select Outbound Changesets.
  • Meanwhile, If a splash page appears, click Continue.
  • In the Change Sets list, click New.
  • Enter a name for your changeset, for example, HelloWorldChangeSet, and optionally a description. Click Save.
  • Go to the Add-in Change Set Components section.
  • Select the “Apex Class” from the choose component type drop-down list, then select the MyHelloWorld and the HelloWorldTestClass class from the list and click Add to Change Set.
  • Click View/Add Dependencies option to add the dependent components.
  • Go to the top of the checkbox to select all the existing components. Add To Change Set.
  • Detail section of the change set page, click Upload.
  • Select the target organization, like Production, and start Uploading.
  • After the change set upload completes, deploy it in your production organization later. 
  • Further, Log into your production organization.
  • From the Setup, enter Inbound Change Sets in the Quick Find box, then select Inbound Change Sets.
  • If a splash page appears, click Continue.
  • Select your change set’s name in the change sets awaiting deployment list, .
  • Conclude by Selecting Deploy. 

Conclusion

To sum up, we have covered Salesforce apex programming and how we can create a custom object and add an Apex trigger, class, and test classes. 


Finally, hence we learned how to test code and upload the code and the custom object using Change Sets to the production tenant.

Top Stories

Software Development Team
How to deploy chat completion model over EC2?
The Chat Completion model revolutionizes conversational experiences by proficiently generating responses derived from given contexts and inquiries. This innovative system harnesses the power of the Mistral-7B-Instruct-v0.2 model, renowned for its sophisticated natural language processing capabilities. The model can be accessed via Hugging Face at – https://huggingface.co/mistralai/Mistral-7B-Instruct-v0.2.Operating on a dedicated GPU server g4dn.2xlarge,
How to deploy multilingual embedding model over EC2
How to deploy multilingual embedding model over EC2?
The multilingual embedding model represents a state-of-the-art solution designed to produce embeddings tailored explicitly for chat responses. By aligning paragraph embeddings, it ensures that the resulting replies are not only contextually relevant but also coherent. This is achieved through leveraging the advanced capabilities of the BAAI/bge-m3 model, widely recognized for
Tracking and Analyzing E commerce Performance with Odoo Analytics
Tracking and Analyzing E-commerce Performance with Odoo Analytics
Odoo is famous for its customizable nature. Businesses from around the world choose Odoo because of its scalability and modality. Regardless of the business size, Odoo can cater to the unique and diverse needs of any company. Odoo has proven its capacity and robust quality in terms of helping businesses
Highlighting 8 Ways to Optimize Inventory Management Using Odoo's Flexibility
Odoo’s flexibility contributes to the optimization of the company's inventory management. From overseeing, controlling, ordering, and stocking, Odoo’s adaptable nature can provide an adequate system to streamline complex processes. A good inventory management system is the key to increasing productivity, implementing cost-effective operations, retaining loyal customers, and saving time and
Delve into the Integration Potential of Blockchain in Odoo
Odoo is famous for its customizable nature. Businesses from around the world choose Odoo because of its scalability and modality. Regardless of the business size, Odoo can cater to the unique and diverse needs of any company. Odoo has proven its capacity and robust quality in terms of helping businesses
Tips for Optimizing and Troubleshooting Odoo POS Development
Tips for Optimizing and Troubleshooting Odoo POS Development?
Odoo is famous for its customizable nature. Businesses from around the world choose Odoo because of its scalability and modality. Regardless of the business size, Odoo can cater to the unique and diverse needs of any company. Odoo has proven its capacity and robust quality in terms of helping businesses

          Success!!

          Keep an eye on your inbox for the PDF, it's on its way!

          If you don't see it in your inbox, don't forget to give your junk folder a quick peek. Just in case.


              You have successfully subscribed to the newsletter

              There was an error while trying to send your request. Please try again.

              Zehntech will use the information you provide on this form to be in touch with you and to provide updates and marketing.